Server Installation
How to install Craftbeerpi4 and it's user interface based on a clean raspbian image
There is also the possibility to install the server from a pre-configured image. Details are described here.
Installation of Raspbian and preparation of the system
First you will need to install Raspbian from an image. The installer can be found here: https://www.raspberrypi.com/software/
CraftbeerPi4 requires python 3.11 and it is recommended to install it on bookworm. It is recommended to use the 64 bit version as recent updates of required packages may cause issues on 32 bit systems. This limits also the usage of the pi hardware. It is know that the Pi 1 and Zero 1 may not be working with the latest cbpi4 versions as some required packages are not compatible with the 32 bit version of raspbian. The Raspberry Pi Zero 2 has been tested successfully as it is based on a quad core 64 bit ARM core. The Zero 2 is capable to run cbpi4 if you don't want to run Chromium directly on it.
You should enable ssh to run commands also via a ssh connection from a remote PC / MAC. Open either a bash window or use a terminal to login via a remote ssh connection to your pi. The default user name is 'pi' and the default password is 'raspberry'. For safety reasons, you should change your password. This can be done with the RaspberryPi imager in the advanced options that can be accessed with CRTL + SHIFT + X.
Once the image has been written to the SD card, you need to place the card in your Pi and start the system. The first boot will take some time as the system will expand the image and needs to boot several times.
Now you should update your OS. Therefore, you need to enter a few commands. These commands need to be run as root. Therefore, you need to place 'sudo' in front of the commands. Open a bash window or connect via ssh to your raspberry.
CraftbeerPi 4 requires another package that needs to be installed prior to the installation of the cbpi server. To install the package, please run the following command.
Starting with the lates raspbian os 'bookworm', python programs can't be directly installed with pip to protect the system from being corrupted by the installation of non managed packages via pip. Therefore you need to install pipx and install cbpi4 via pipx in a virtual environment that is being created automatically by pipx.
If you want to install pipx under bullseye, you might need to install python3-pipx instead of pipx
If you are using a Pi4 or even a lower Pi version you need to make sure, that the pre-installed RPi.GPIO package is not installed. This is not relevant for the Pi5.
Please run:
to remove the package from your installation.
Starting with cbpi4 4.3.0, the RPi.GPIO package won't be used anymore as it is not compatible with th Pi5. A replacement package (rpi-lgpio) is used instead which can be used as a 1:1 replacement and the code of cbpi does not need to be changed. However, you can't have RPi.GPIO and rpi-lgpio installed in parallel as this will result in malfunction of all GPIO related functions.
This will be also relevant, if you upgrade from an older cbpi version which did install RPi.GPIO. In this case you need to ensure that RPi.GPIO is not installed on your system but also not in your virtual environment.
You might need to remove the RPi.GPIO package from your virtual environment manually if you upgrade from 4.2.0:
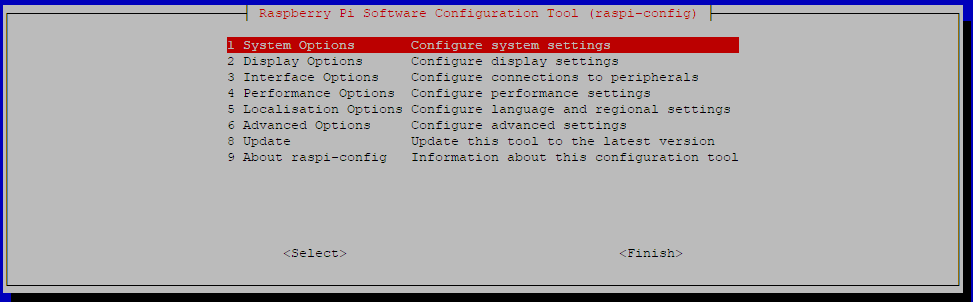
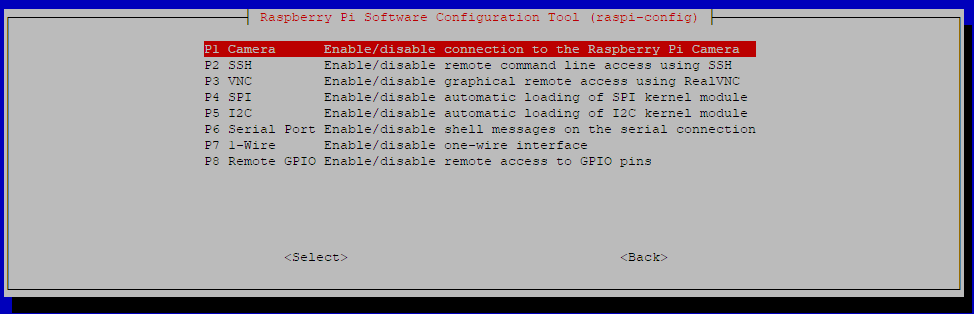
If you want to use hardware that is connected via I2C (e.g. LCD Display), you need to enable I2C in the raspi-config. You can also enable the onewire support in the raspi-config. Therefore, you need to run the command:
This will open the following window.
Select Interface options to enable I2C, Onewire support or whatever you need.
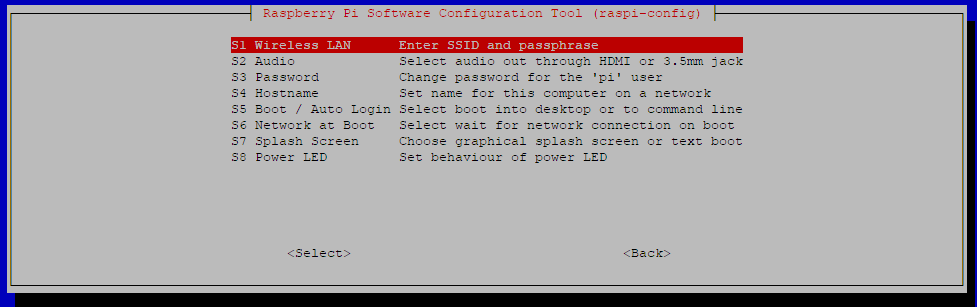
From the main menu you can also select system options to enable and configure Wifi.
If you were using the full image of raspbian, the next steps are not required, as the packages are already included. On the lite image, you need to install a couple of packages, before you can install the server and user interface. Please run the following command to install the python3 package manager:
Now you can start installing the cbpi server.
Installation of CraftbeerPi 4
The installation of CraftbeerPi4 is done with the package installer for python (pip3). You can install the server directly from pypi.org with the following command:
Now you need to add the path of the cbpi installation to your path:
This will allow you to run cbpi directly from the command line. You might need to close the terminal and reopen it again that the added path will become effective.
To install craftbeerpi4 from the repo which can be newer once in a while, please run the following command:
The installation will take some time and it will also install the user interface.
To upgrade the user interface or to install plugins, you can use the following command:
In this case cbpi4gui is the name of the plugin which is available as package on pypi.org. This might not be the case for all plugins as not all developers make the plugins available via pypi.org.
In this case, you can also install packages from github:
In rare cases you may need to go into the virtual environment to install or remove plugins. This can be done with the following commands:
You need to activate the virtual environment first:
If you have installed cbpi under the 'pi' user, you will see something like this:
This means, you are now in the virtual cbpi4 environment
To upgrade the user interface now from the virtual environment, just run:
There could be a newer version of the user interface in the repo and you could install this also directly from the repo.
There are also development branches of some repos. These branches will be used to test some new features before the code is rolled out to the master or main branch. These branches are typically working, but should not necessarily considered as stable. The installation of these branches will be described in the development section.
To get back from the virtual environment to the normal environment, just type:
Now you need to setup cbpi to create a config folder:
This will show you the following output:
Then you can try to start cbpi the first time manually:
You should see the following output in your bash window:
Now try to access cbpi via the web browser on your PI or on external client systems, like other computers or mobile devices. Therefore, enter in your browser:
IPADDRESSOFYOURPI:8000 -> e.g. 192.168.10.100:8000
If you see the empty dashboard of Craftbeerpi4, you were successful. Now you can go back to the bash window and press CTRL + C to stop the server.
Automatically start the server as service
If you want to autostart the server when the pi is booting, you can enable that with the following command:
The following output should be on the bash screen:
The craftbeerpi.service file is located in your config directory and configured for the user pi. If you have installed cbpi under a different user or did run the setup in a different folder than /home/pi you need to change the craftbeerpi.service file manually.
[Service]
WokingDirectory=/home/pi
Just replace /home/pi with the path where your config folder is located
If you want to remove the autostart during boot, simply run this command:
It will take some time to stop the server and finally you will see this output:
To see the status of cbpi autostart, you can run the following command:
If you want to stop the server (running as service) for some reason (e.g. debugging), you can stop the server with the following command:
You need patience as this will take some time.
Then you can start the server in manual mode to see the logging and you can stop it again with CTRL + C:
With recent version of cbpi4, the default logging is done only for warnings and errors. If you want to get a more detailed log, you need to add a parameter to the start.
This will increase the log level to 'info' if you run cbpi in manual mode
With cbpi version 4.2.0 you can also modify the config.yaml file in our config folder and add debug-log-level: 20 to set log level to 'info'. Just change the parameter to 30 and log level is set back to 'warning'. This will enable different log-levels from info also in server automode.
To restart the server as service you can either reboot or just start it as service directly:
Automatically start chromium in kiosk mode at startup
You can enable chromium kiosk mode via command line. If this is enabled, chromium will start after boot in kiosk mode with craftbeerpi4.
This has been tested on the full raspbian version where chromium is installed as default. For other setups you may need to install the chromium browser manually.
With Chromium 98 on bullseye (32 and 64 bit), Chromium might start with a white screen and won't load the server on startup. If you experience this issue you need to disable hardware acceleration in Chromium settings.
To enable kiosk mode, you need to run the following command from the bash:
You will see the following output that the required file has been copied to the autostart folder:
You can also disable the kiosk mode via command line. Therefore, you need to run the following command:
You will see the following output that the file has been removed from the autostart folder:
You can also see the status for Chromium kiosk mode if you run the following command:
Installation of Craftbeerpi 4 from a pre-configured image to your sd-card
There is also the possibility to write an image with a pre-installed CraftbeerPi4 server to your sd-card. This image comes with several installed plugins.
The image can be downloaded from this link which is kindly provided by Nicolas Slammy Outrey.
The latest image is now based on bookworm os which requires some changes in the installation process compared to earlier images. Please read the installation instructions carefully. You will need to use the Raspberry Pi Imager if you want to enable WiFi due to changes in bookworm.
The image is based on Bookworm 64 bit nad has been created on a Pi4. You can't run it on Pi hardware that is not capable to run 64 bit OS (e.g. Pi1, Zero 1,...) It has also not been tested on a Pi5 as the original image has been explicitly downloaded for a Pi4.
Current Version:
You can install further plugins as described in this part. But you can and should also deactivate plugins that you don't require.
The images has the following properties:
Based on Raspian full 64 bit (bookworm)
Image will expand on first boot to size of sd card (Please be aware, that the system wil start several times until it is up and running. This will take a couple of minutes)
Server will autostart after boot.
Wifi and Bluetooth are working.
SSH is enabled.
Onewire support is enabled.
I2C support is enabled.
Installation is done under user 'Pi'
mosquitto is installed and enabled with user: 'pi' and password 'cbpi4'
User: pi
Password: raspberry
Please Note: Password can be changed when you write the image with the Raspberry Pi imager, but you cannot change the user since cbpi has been installed under user 'pi'
Installation:
Unzip the image. It will inflate to ~8 Gb
Write the image to a sd card with min size of 16 Gb with the Raspberry Pi imager.
Select the model of your Pi, but be aware, that older models with non 64 bit CPU won't be working and the Pi5 might also not be working with this image
Select 'Use Custom' as image and select the extracted image.
Select the correct SD card you want to write the image to.
If you want to enable Wifi, you need to change the default settings in the next step
Enter your SSID and your credentials at the corresponding settings
Change the Wifi Country and if you want also the keyboard layout
you can also change the password but DON'T change the user name.
hit save and write the image to the card
Insert the sd card into your raspberry and wait. The device will boot several times which can take up to a couple of minutes
Once the server is up and running, you can access it from a browser via IP_OF_YOUR_PI:8000
If you are using for instance a screen with your raspberry, you can also activate autostart of chromium with cbpi
Please refer to Automatically start chromium
On the next start, Chromium will be shown on start with the cbpi Dashboard.
It may also happen that you are not automatically logged into the desktop during startup.
In this case you need to start change this in the settings
Updating your server and UI from the forks
Updating the Server
If you want to update the server, you just need to run the same command as you did already for the installation of the server but should use the upgrade option:
From the repo you will need to use the install options with the force flag ad the upgrade option is not working for urls:
If new setting parameters have been added to cbpi, it will handle that in the extension Config update. Cbpi4 will add the parameters automatically during start if they are not yet in the config file.
Updating the UI
To update the user interface, you need to use the command
Or from the repo:
Alternatively, you can do this also by entering the virtual environment as described above.
Other Hardware Tips
Mute your buzzer at startup
If you are using a CraftbeerPi extension board that has a buzzer installed, the buzzer might play an annoying sound during startup. You can stop this by adding one line to the config.txt file in the boot directory. In case of the 4.0 extension board, the buzzer is connected to GPIO5. If your buzzer is connected to a different GPIO, you need to replace the 5 with the corresponding GPIO number. By adding this to the config .txt file, the GPIO will be set to out and low at boot and the signal will stop.
Display your GPIO numbers with wiringPi (most likely not working on the Pi 5)
Although, wiringpi is deprecated, it can be useful to get some insights into your pin numbering. CraftbeerPi 4 is using BCM numbers for the GPIOs and wiringpi can list them. Make sure, you have installed the latest (and last) version 2.52
to install wiringPi, open a bash window and run the following commands
You can check the version with
To see the details for your hardware, just type
This will show the following table
CraftbeerPi 4 is using the BCM numbering for the GPIOs. Please use the numbers of the corresponding column for your GPIO assignment.
The numbering could also vary depending on the Pi you are using.
Alternative setups
Docker
While CraftbeerPi is primarily created to be run on a RaspberryPi you can also use a docker image to run it. It can be found in the container registry on GitHub under the name ghcr.io/pibrewing/craftbeerpi4.
The image is currently only available for arm64 and amd64 architectures. If you want to run the image on a RaspberryPi make sure that you have installed a 64bit version of the operating system.
The image is available under several tags:
latestthe latest 'stable' release that is built from the master branch.v4.x.x.ximage for a specific version.devimage for 'unstable' version built from the latest development branch.
Currently the GPIO functionality is not supported in the image. But you can use it with e.g. MQTT sensors and actors.
Preparing configuration data
CraftBeerPi requires several configuration files in order to run correctly. Those files should not be located in the containers filesystem, because changes to those files would be lost in case the container is recreated (e.g. when upgrading to a new version).
It is advisable to create the initial configuration outside of the container and use a volume mount to make them available to the container when starting it.
Running the base image
To run the image with the newly created configuration files you can use this command:
Installing plugins
Installing plugins has a similar requirement as the configuration files. They should survive a container recreation. This is why it's not advisable to install them in a running container but create your own Dockerfile for it.
This Dockerfile can use the official one as base and extends it by installing your own plugins.
Then build your own image.
docker-compose
Of course you can use docker-compose to setup your environment. You can also use your own image if you created one (see previous section).
And then run it with
For first time creating a docker image for V4.2.0 after running earlier versions, it is (as in a normal setup) not possible to use the config in the existing config directory.
Best practice:
create a backup. Rename or delete the old config directory. Create a new config directory and do all following steps as described in the docker section run the clean image in docker restore the backup
Last updated