Example System: Speidel Braumeister 20L (2015)
This setup is working with a Speidel Braumeister 20 Plus (2015). It should also work with the 10 and 50 Liter models.
However, for the 50 Liter model you need to figure out on how to manage the two pumps and heaters. I recommend the GroupedActor Plugin to combine two actors into one.
Hardware requirements
I recommend to use the original temp sensor from the Braumeister which is a 2 wire PT1000. In this case you don't need to deal with thermo wells that may not fit into the existing hole of the Braumeister.
Therefore you need to add a max31865 board (incl. a 4300 ohm resistor for PT1000) to your craftbeerpi hardware setup.
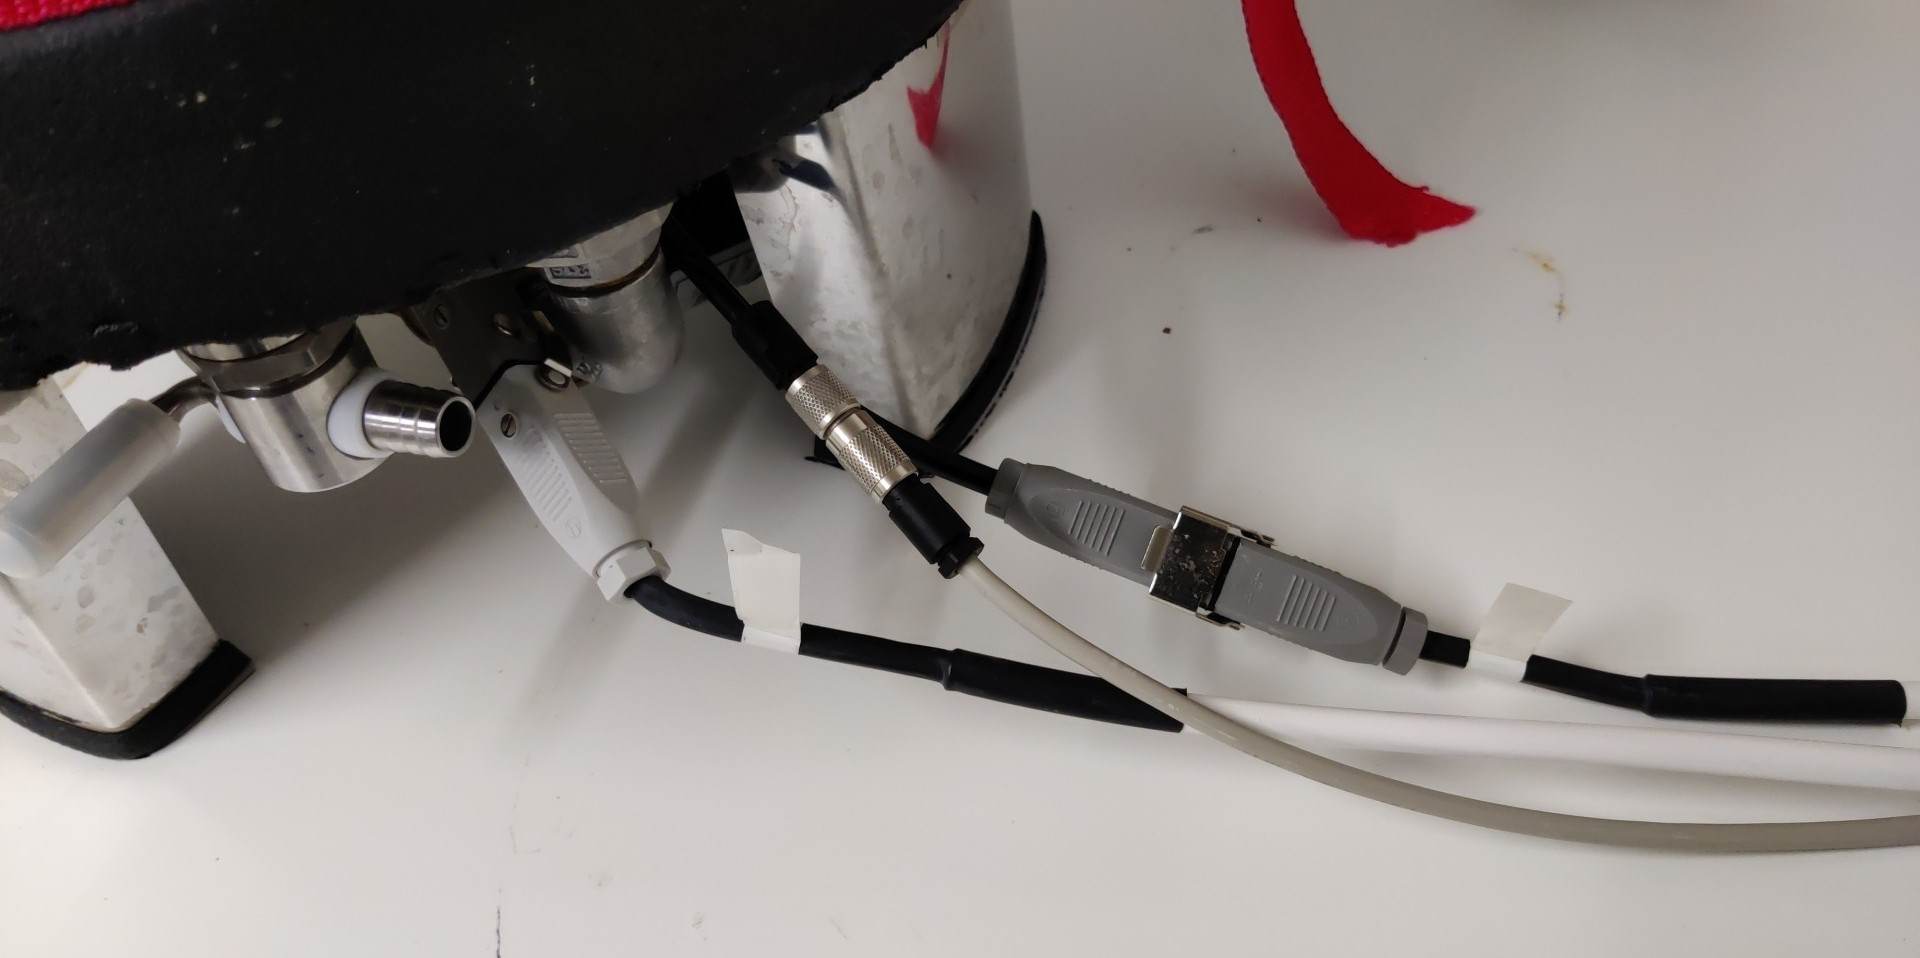
To connect to the probe, you need a Binder coupling connector
You just need to unplug the probe from the Braumeister controller and plug your cable with the aforementioned connector to your craftbeerpi setup
To connect the pump and the heater, you will need Hirschmann connectors. I am using the following connectors
Hirschmann STAK 2 for the pump
Hirschmann STAK 200 for the heating element
You will need 2 Hirschmann safety Clips
Just unplug pump and heater and connect it to your Relays outputs. I am using SSR for both, heater and pump. They can handle 20A @ 240V AC
Thats about it for the hardware part.
The image below shows how you connect your Braumeister to the aforementioned plugs:
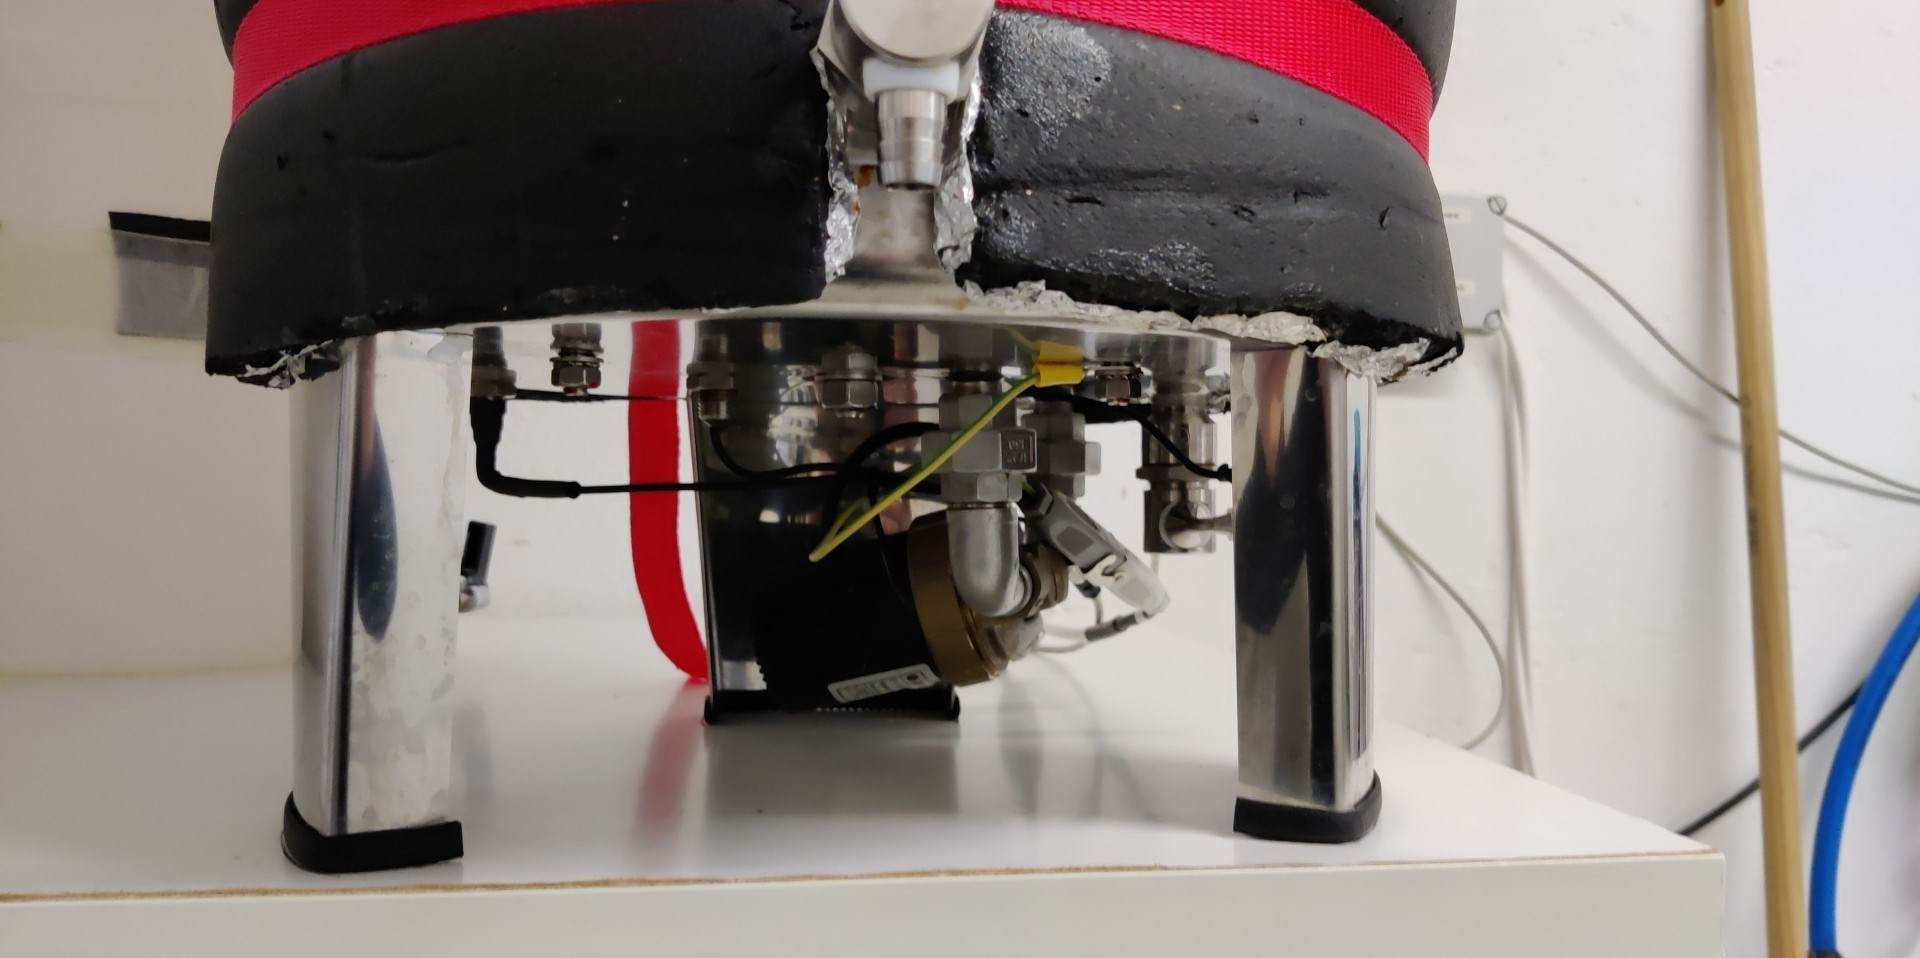
I have removed the original controller completely from the Braumeister:
Only the pump plug has a ground connection on the Braumeister side. I strongly recommend to add a ground connection from the heater plug (Braumeister side) to the Braumeister Kettle (Yellow/Green Cable in the image above)! You will also need to ensure ground connection from your controller side!
Optional Hardware requirement
You can add a magnetic valve to the inlet of your cooling jacket as this can be triggered during the cool down step. It'll open, if you configure a corresponding actor as cool down valve and set it up in your settings. When the cool down steps starts, the valve opens and your cooling water starts to flow until your pre-configured temperature is reached. Then the valve is closing. An example picture is shown below:
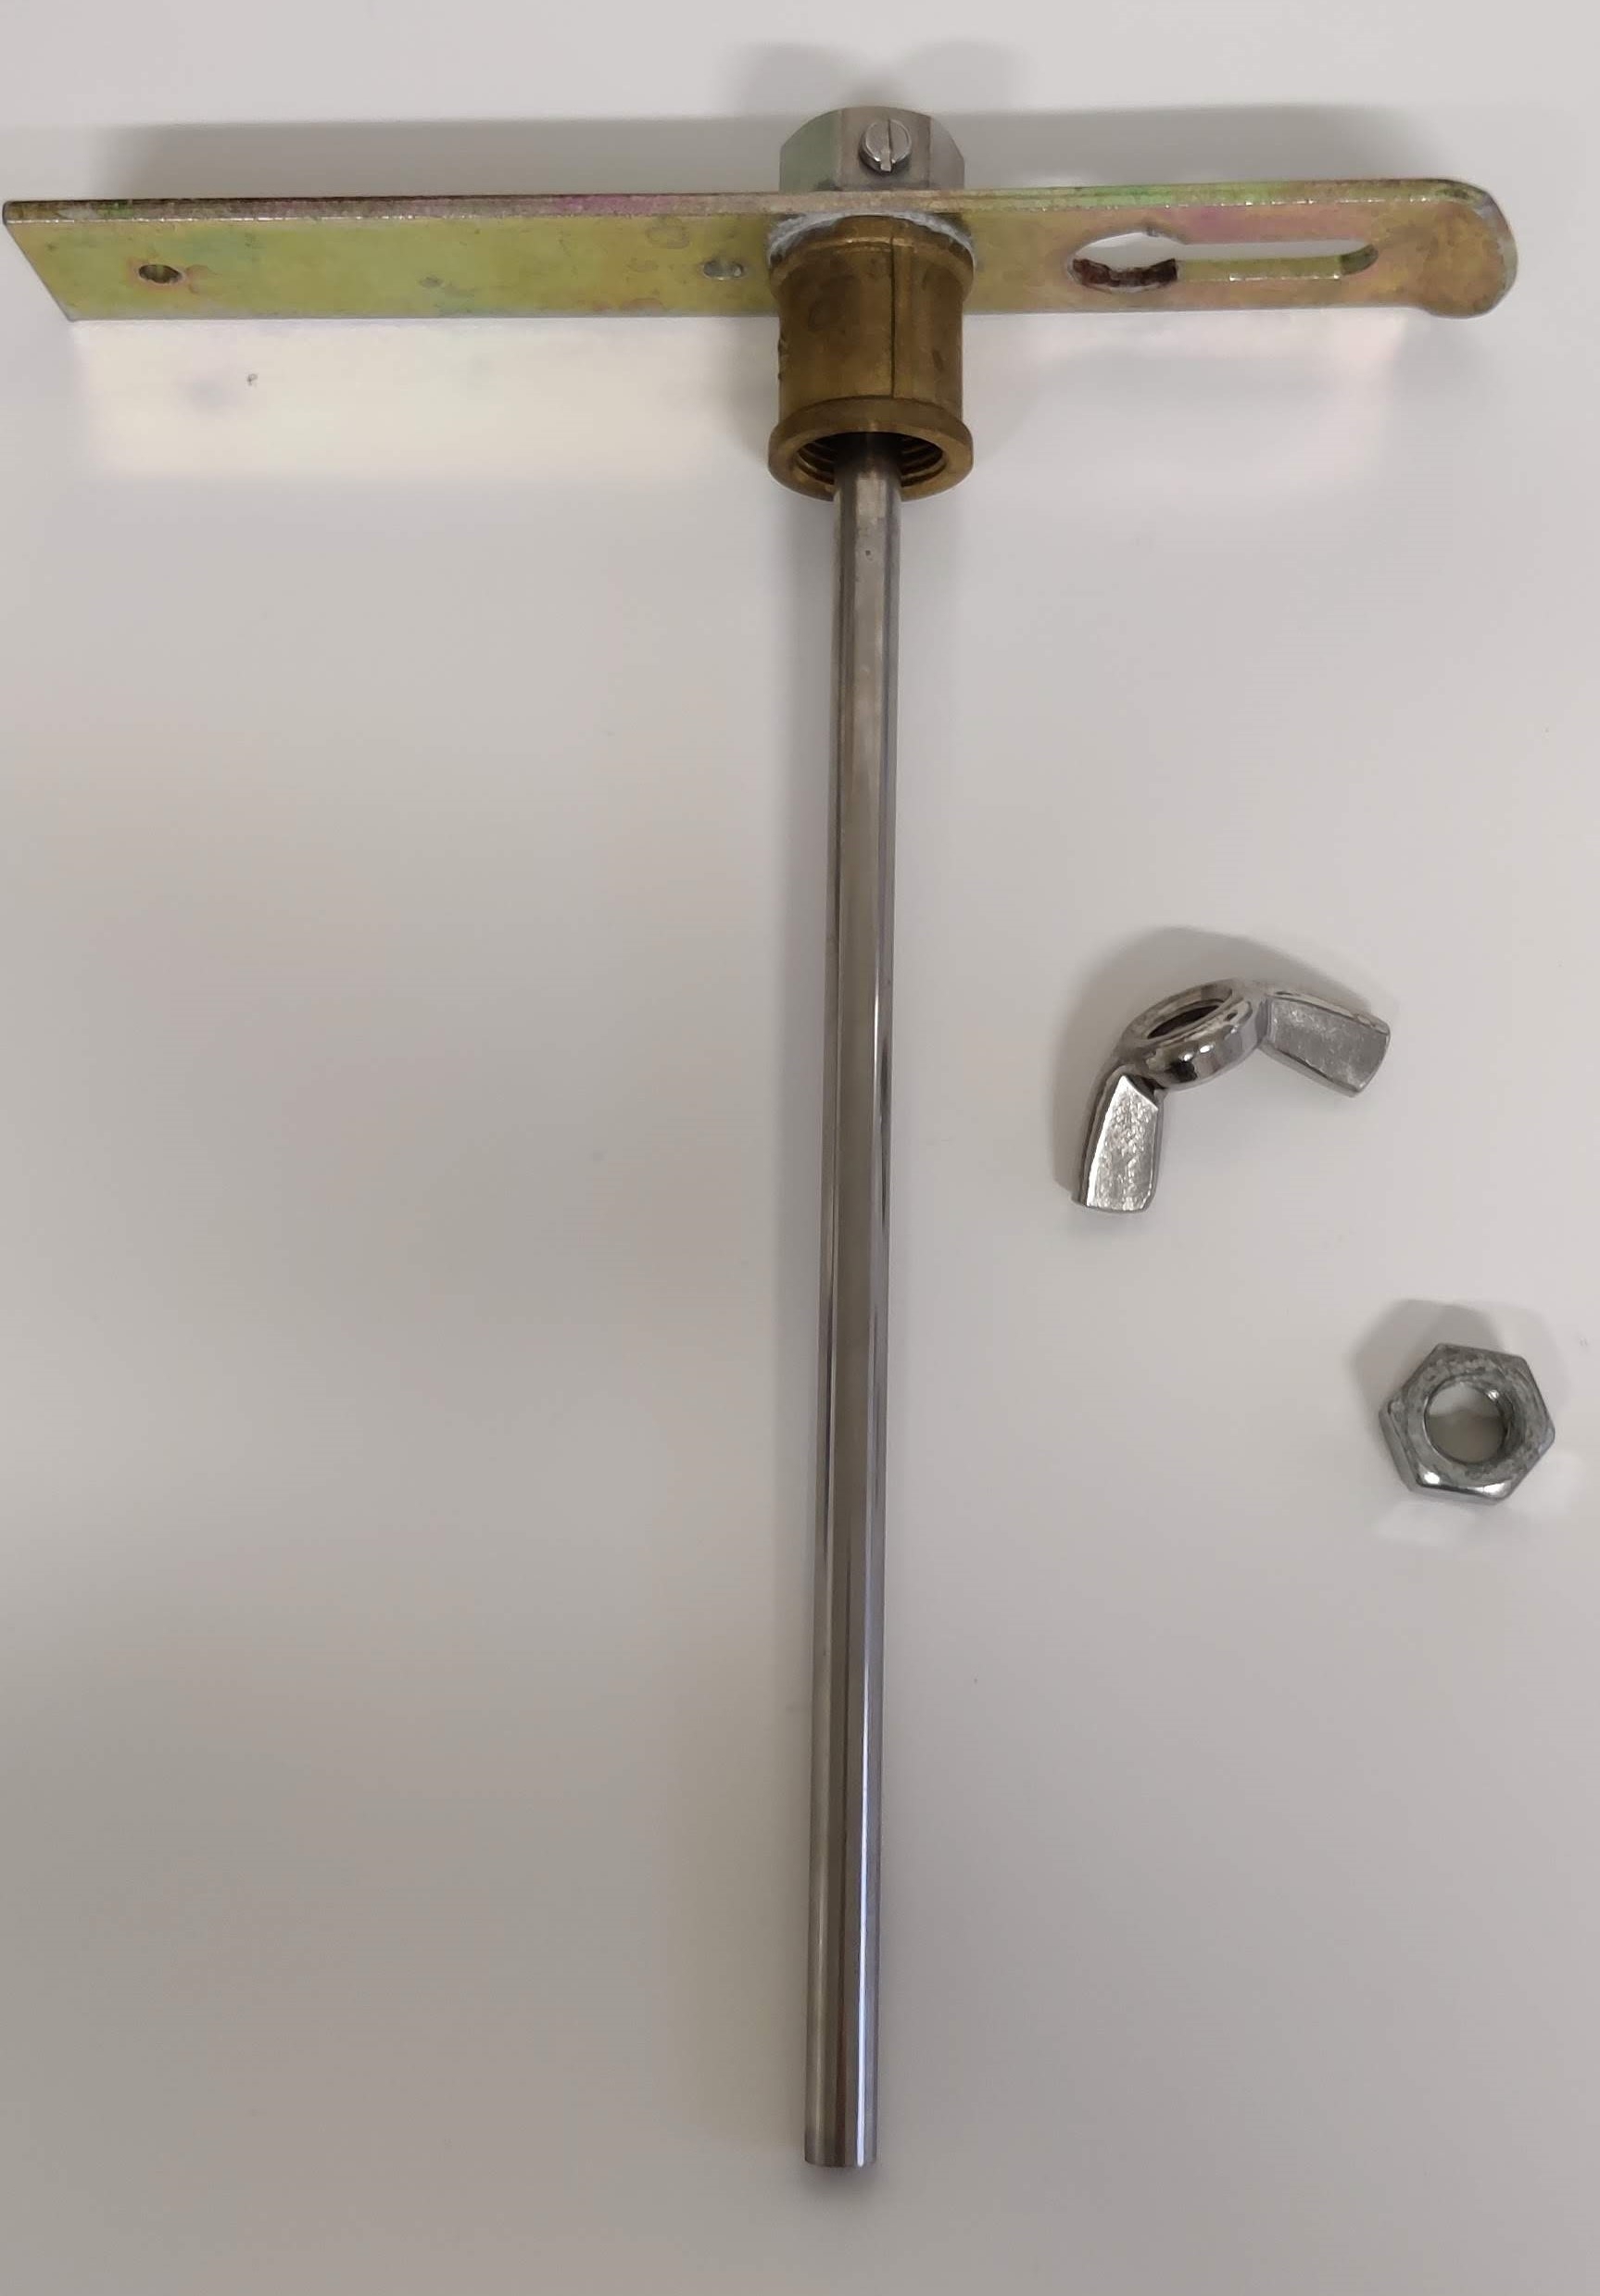
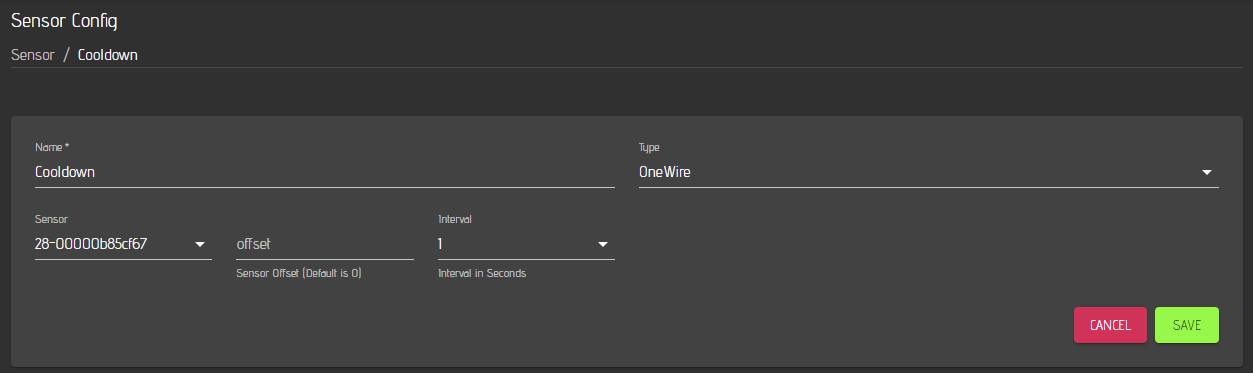
In particular the older Braumeister models have some issues with the accurate temperature readings when cooling down your wort. Therefore, I recommend to add another temp sensor (e.g. OneWire) to your braumeister during cool down. The second sensor for cool down can be configured in the CraftbeerPi 4 settings. You just need a thermo well and some parts to fix your thermo well and sensor to the middle column of your Braumeister prior ro the cool down step.
An example for the parts is shown here:
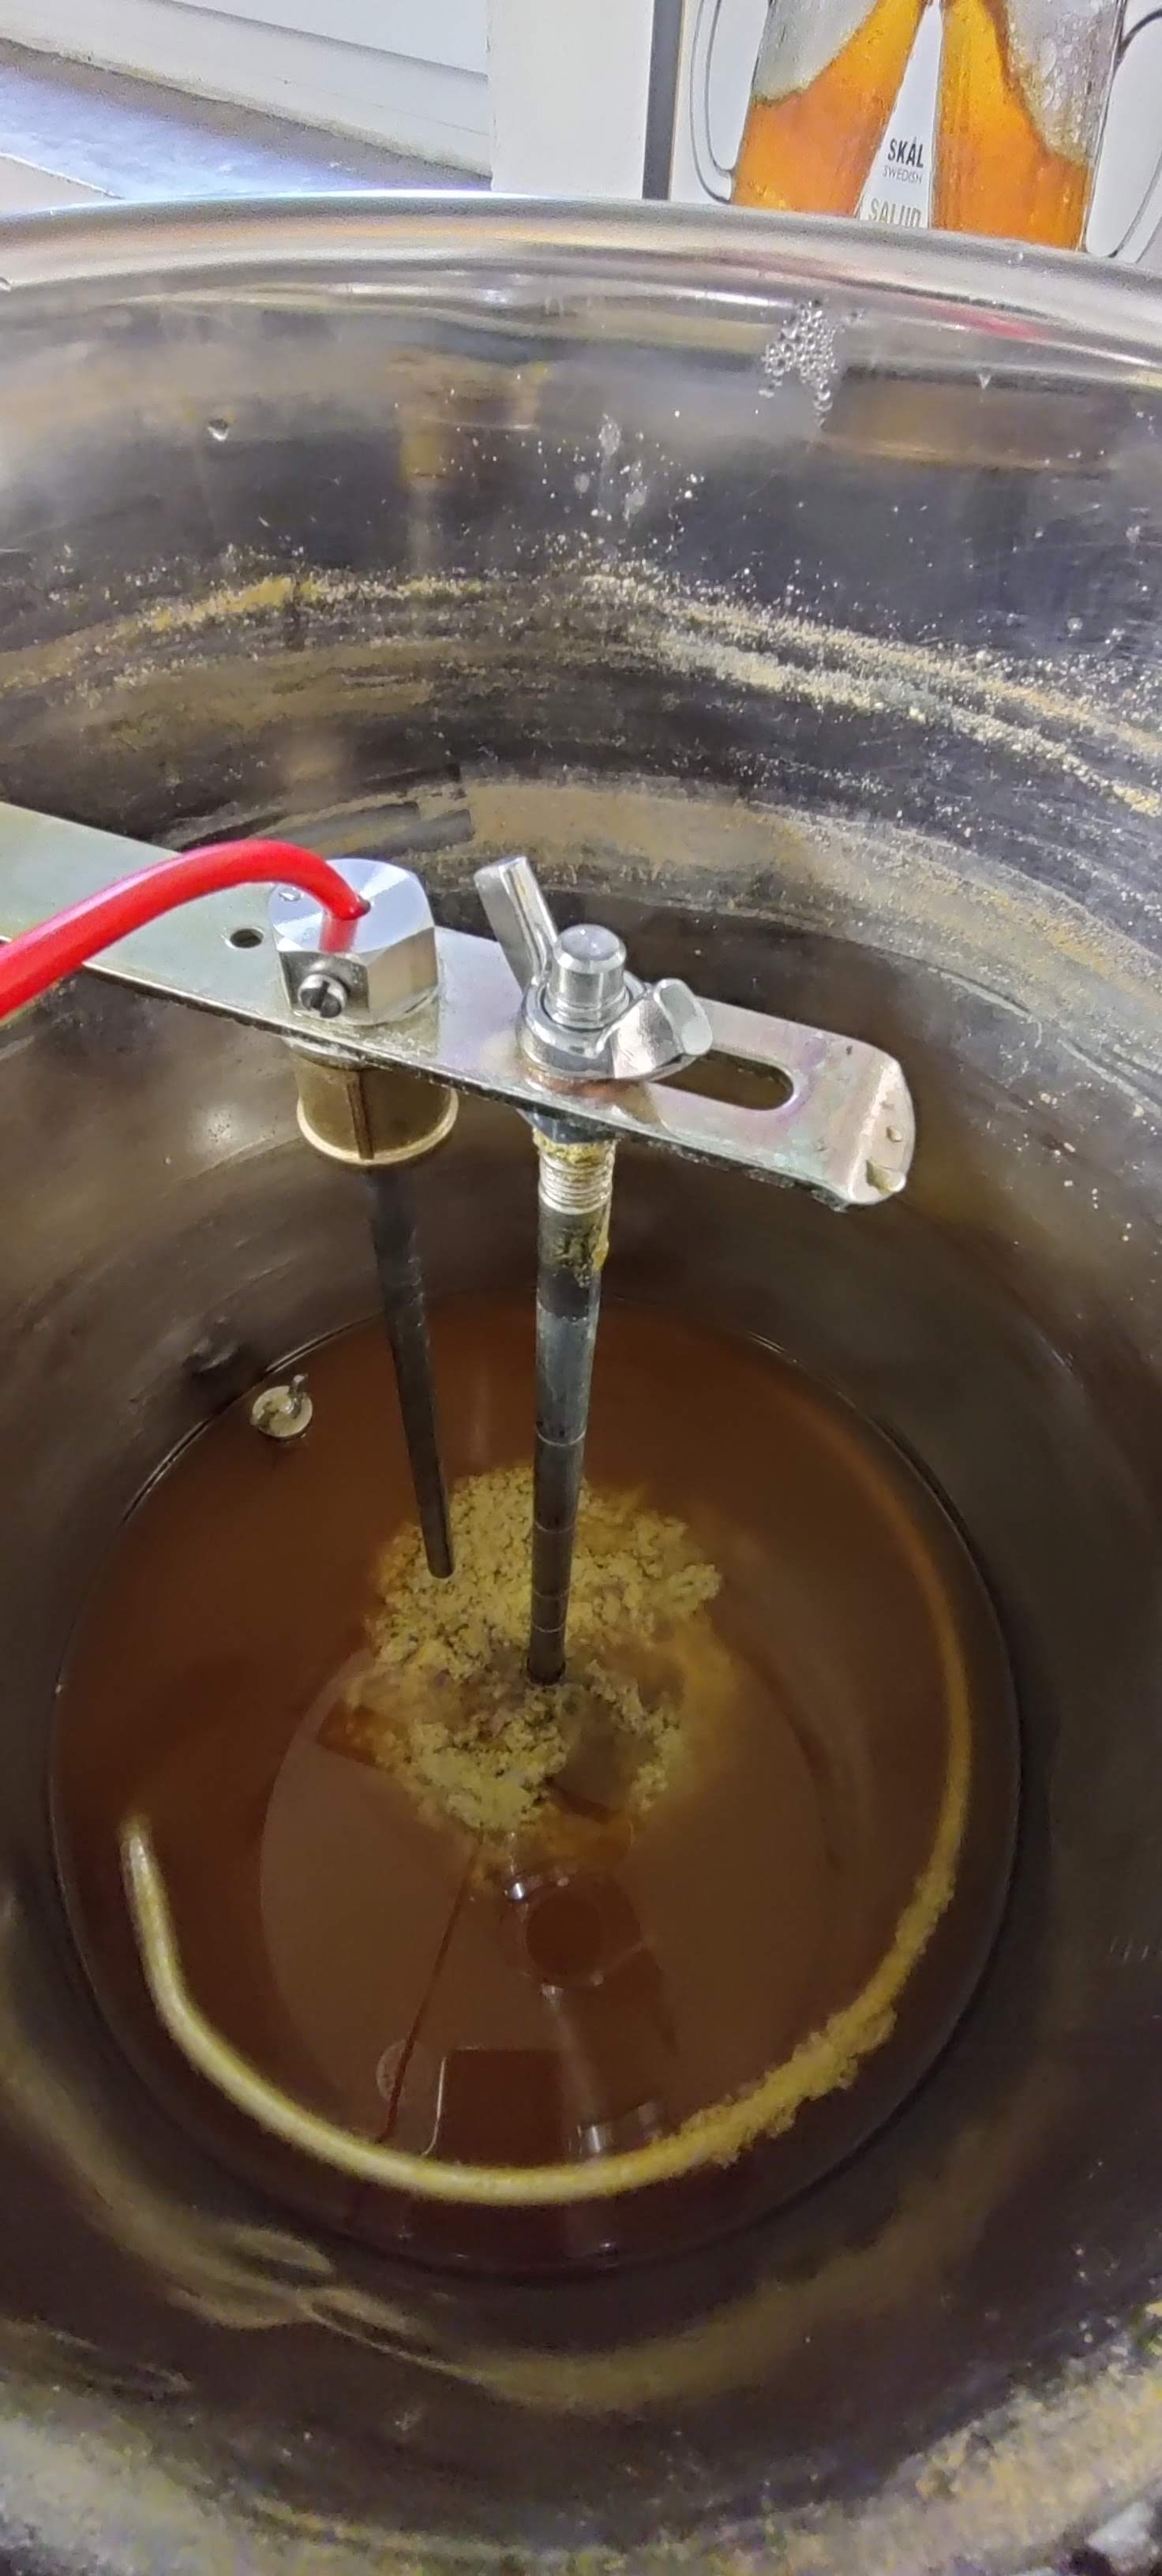
The placement of the Thermo well with Sensor after cool down is shown here:
CraftbeerPi 4 software requirements
You need an installation of Craftbeerpi4 with some additional plugins.
You will need the cbpi4-pt100X plugin to read the temperature values from the PT1000 and configure it to PT1000.
You will also need a logic plugin that covers pump pause, pump stop @ 88°C, PID temperature control and much more
The PID settings have to be optimized for your kettle with the PIDAutotune plugin.
PID control switches off at 88°C and boiling will be done with reduced heater power which can be defined in the logic settings (mine is running at 85% power during boil)
I do recommend to install and use also the Pushover Plugin to receive push notifications when you need to add or remove the malt pipe or add hops. Therefore, you need to buy the PushOver APP for Android or IOS
I also recommend to install the Kettle Sensor Plugin if you want to monitor some more information.
If you have a buzzer connected to your system or if you are using an extension board with a buzzer, you should install and configure the Buzzer plugin accordingly
Setup your Braumeister hardware in CraftbeerPi 4
Details on how to setup your software are not shown here, as this is already described in the other chapters. GPIO settings depend on your individual controller build. ALso the inverted setting depends on your controller hardware configuration.
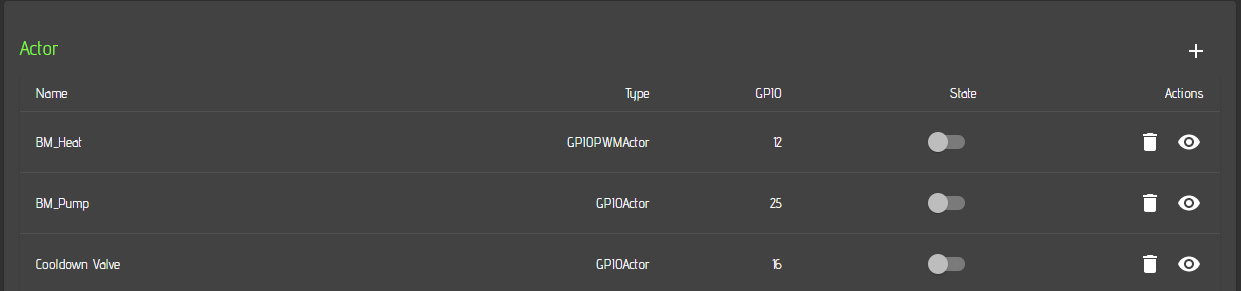
Actors
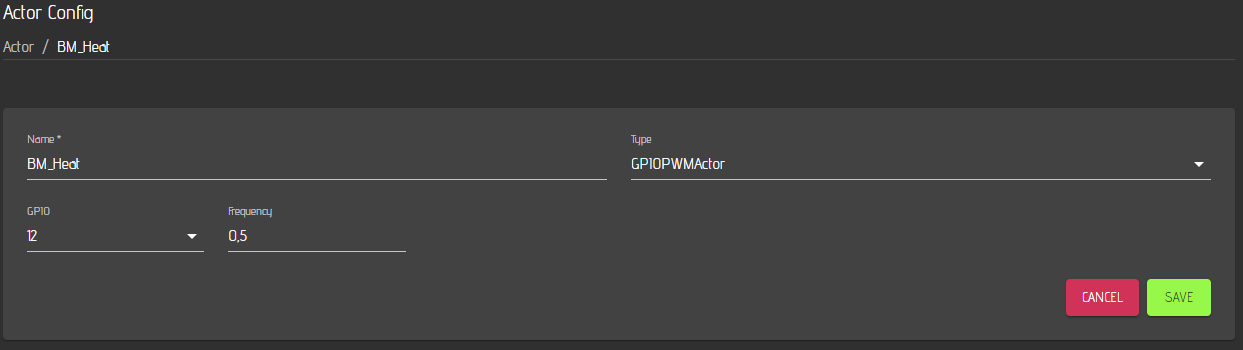
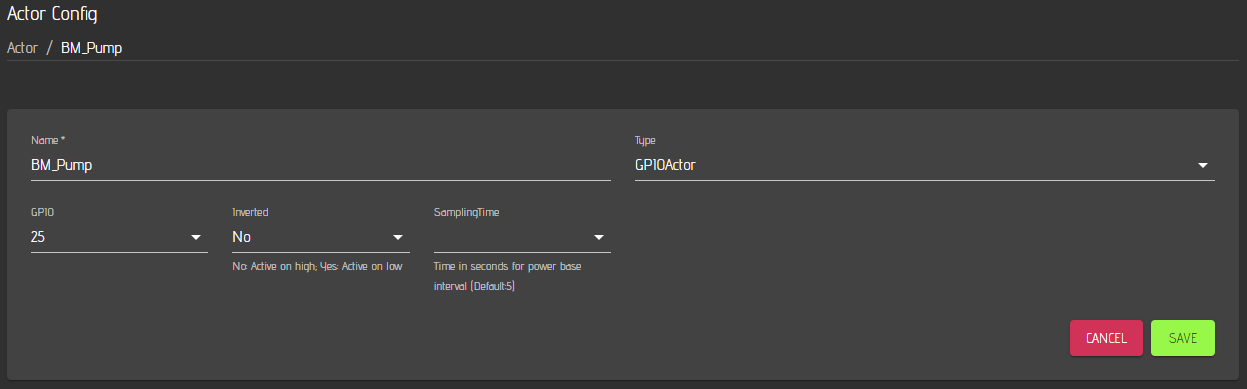
First you should define your actors for the Braumeister. You need one for the heating element and one for the pump. In case you want to run a magnetic valve for the automated cool down, You need to add another actor for the magnetic valve.
For the heating element you can use a PWM type actor. As frequency, you can choose something between 0.1 and 0.5 Hz. Higher frequencies are not recommended and can cause also issues in your house (e.g. flickering lights). To be on the safe side, choose 0.1 Hz.
For the pump select a regular GPIOActor as it will be only switched on or off once in a while. You can leave the sampling time empty as it is not relevant for this actor.
In case you are using a cool down valve, you can configure it in the same way as the pump.
Sensors
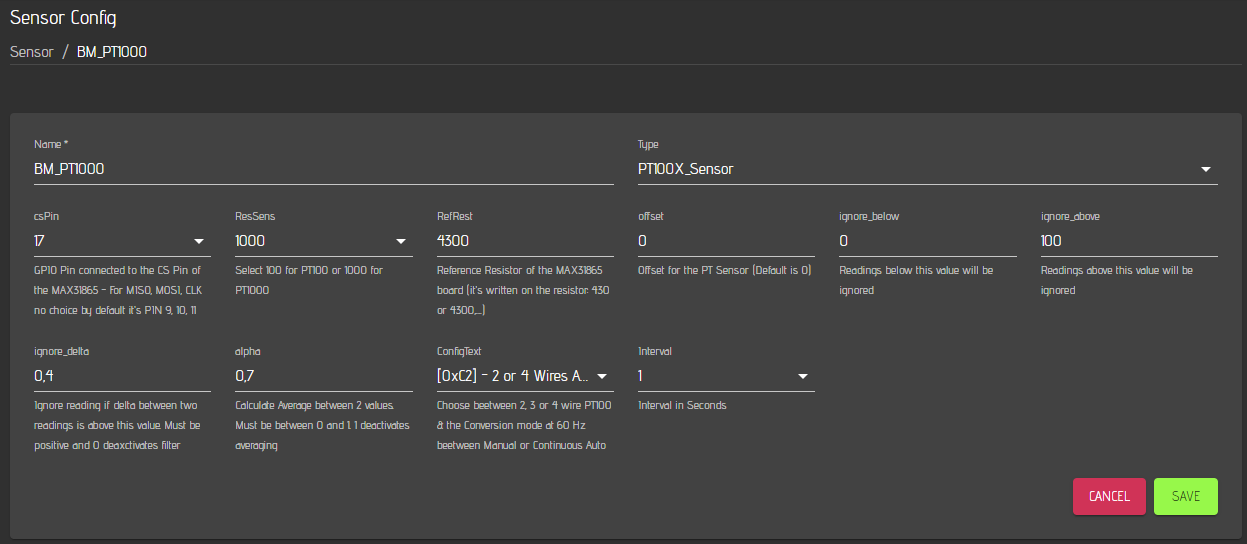
Now you need to define your sensors. As mentioned, the Braumeister comes with a 2 wire PT1000. As mentioned above, you need to have a corresponding board connected to your Pi and you need to install the required plugin as mentioned above.
Configure your sensor and choose 1000 as resistivity value and 4300 as resistivity for your reference sensor (You need to buy the correct max board for the PT1000 and not one for a PT100). Choose 2 or 4 wires in the sensor settings. The other parameters are described in detail on the plugin page.
If you want to use an additional one wire sensor for cool down, you need to set up this sensor as well. Below is an example:
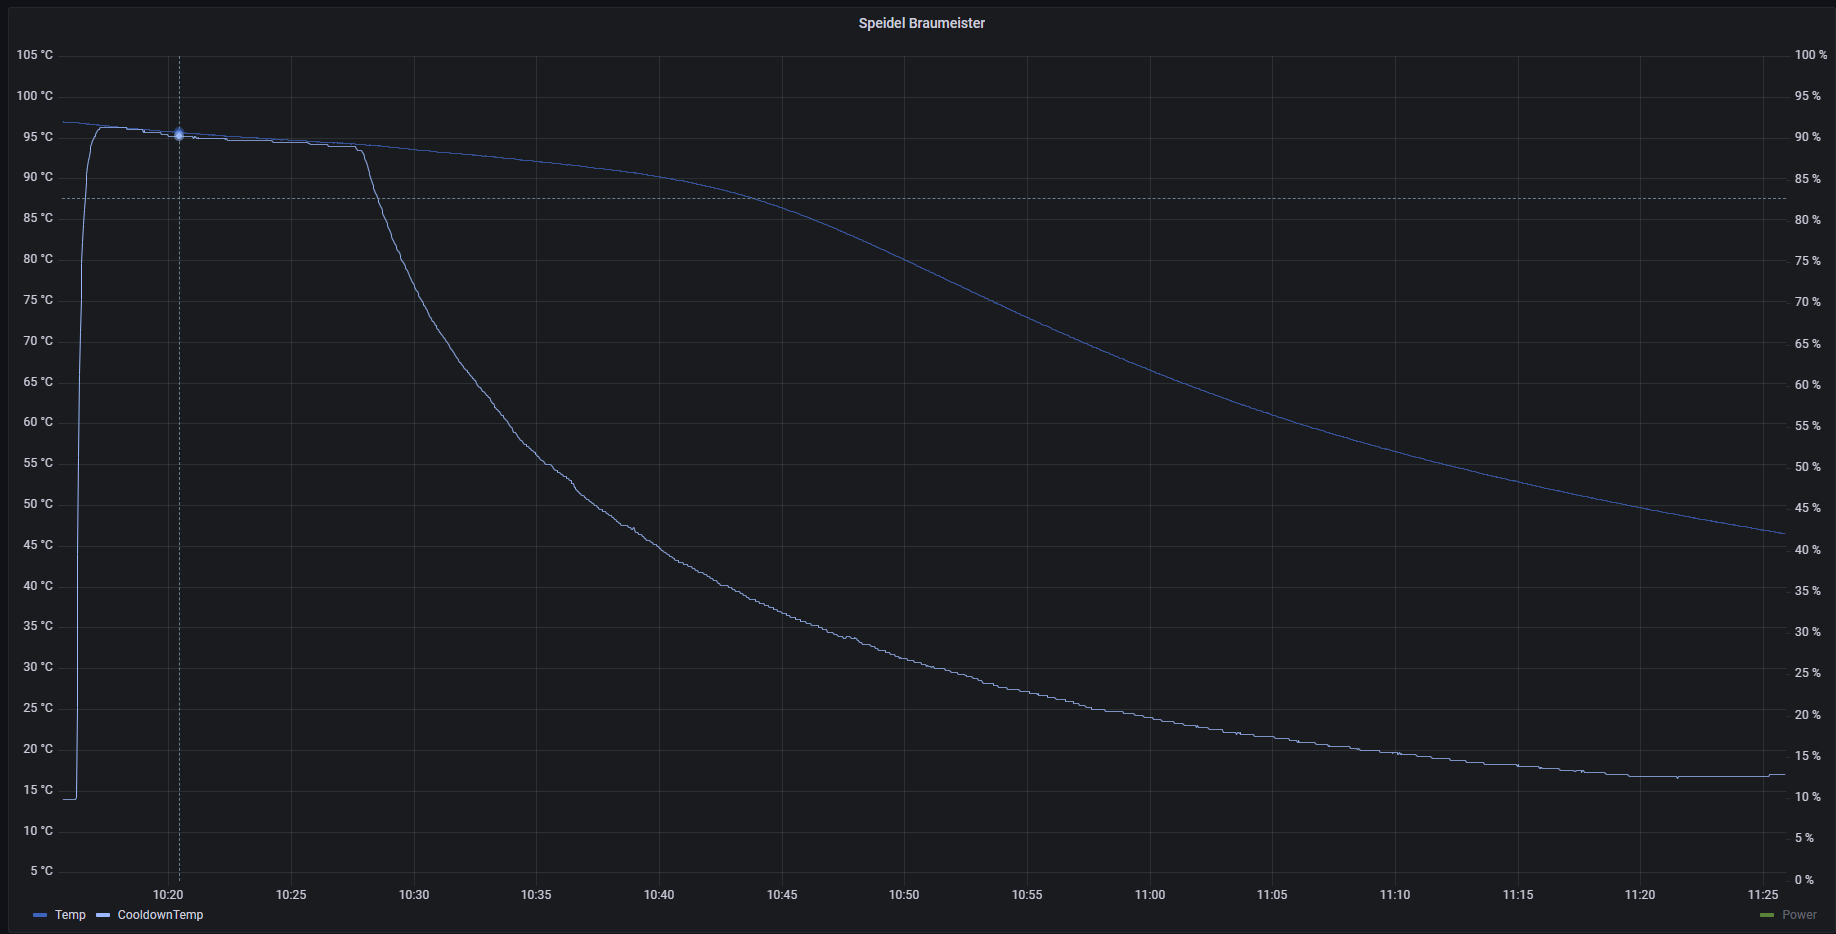
The advantage is that you measure a more realistic temperature of your wort during cool down as the PT1000 sensor is covered and 'isolated' with trub. Below you can see the difference for the PT1000 and the Cool down sensor.
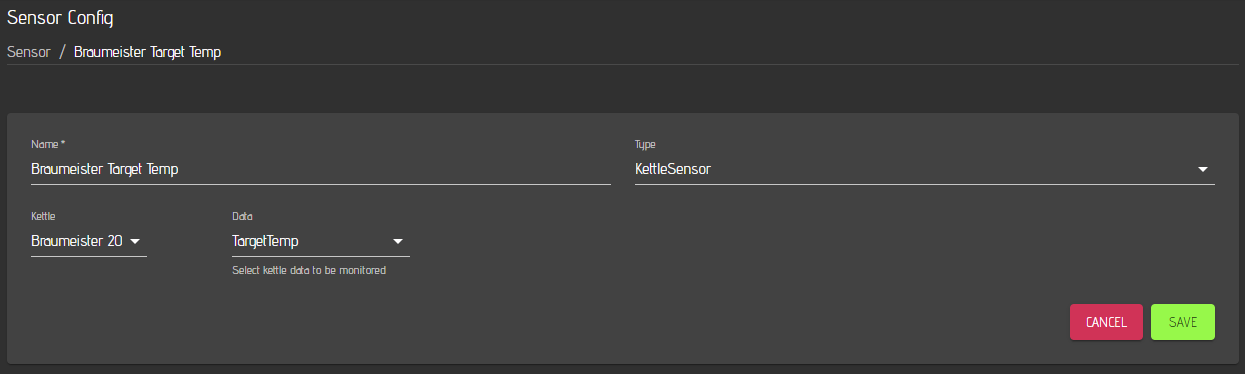
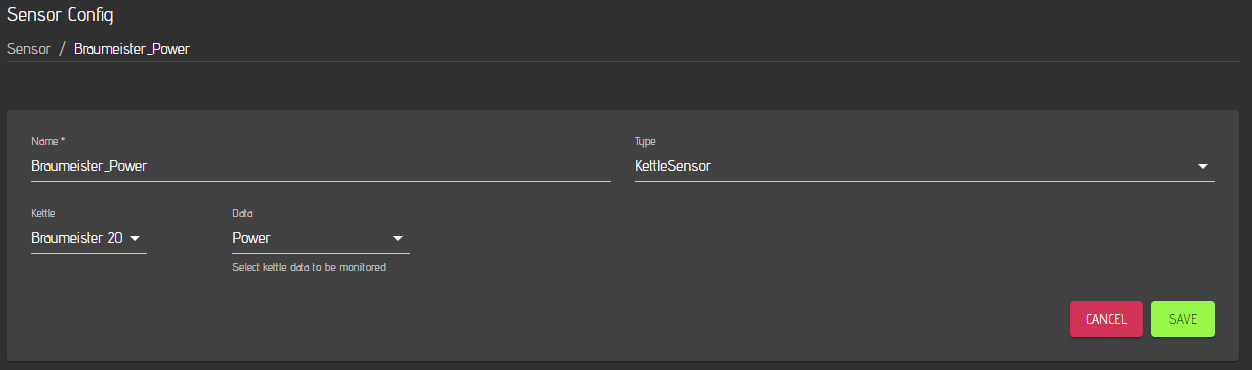
Optionally, you can also install the KettleSensor plugin and add two additional virtual sensors for your Braumeister: Target Temperature and Power. These sensors can be used to display both parameters.
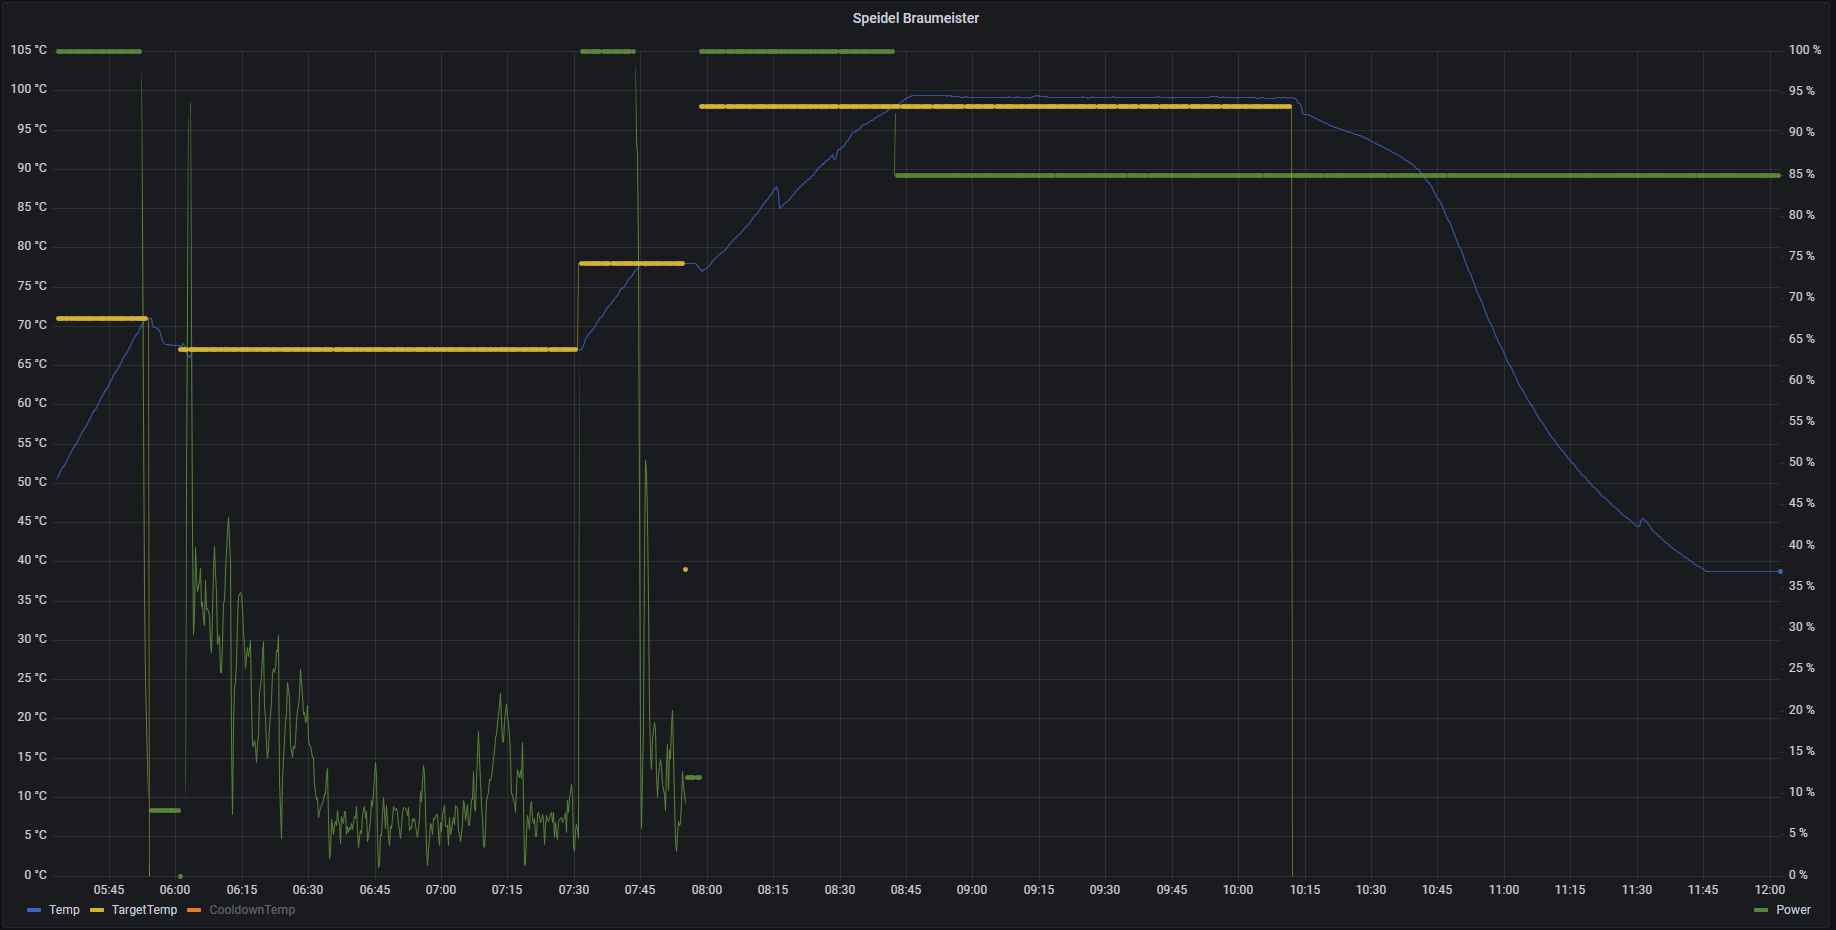
In case you are using influxdb and Grafana integration, you can display the relevant parameters for your brewing session including the target temperatures, the heating power and the measured temperatures.
Kettle configuration
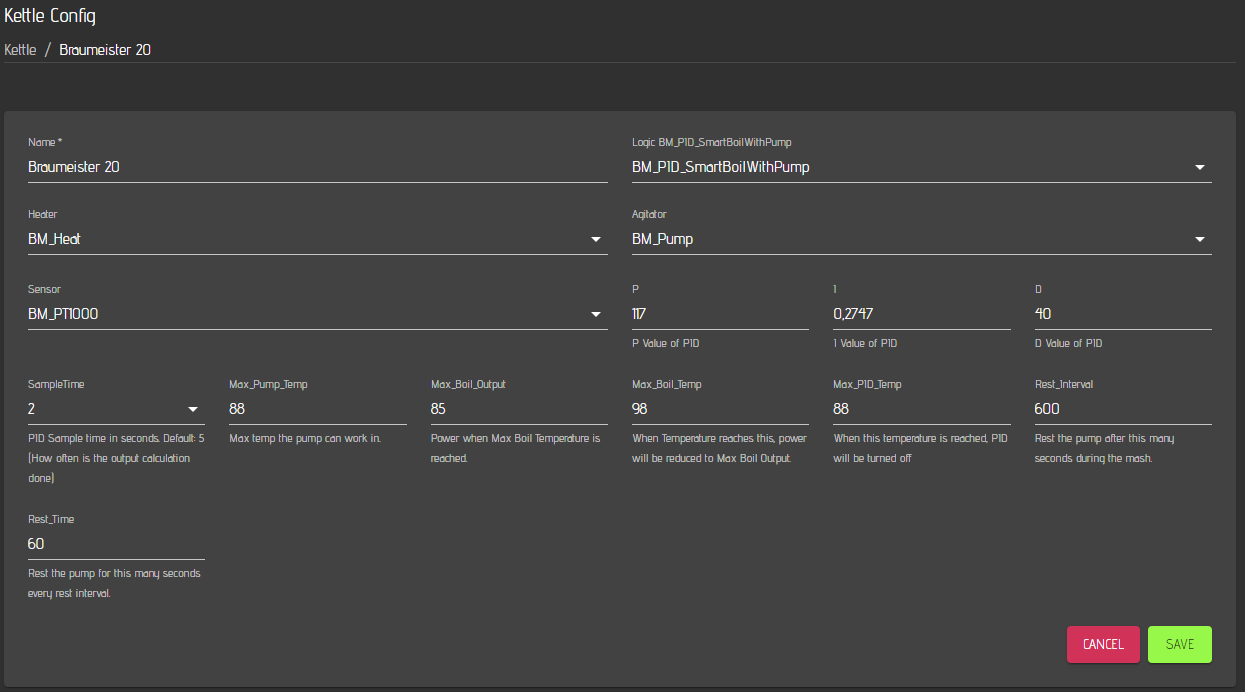
Finally, you need to define a Kettle with the required logic plugin mentioned above. Select the installed BM_PID_SmartBilWithPump plugin as logic and define a Name for your Kettle. Select the Actor you have defined as Hater for your Kettle Heater and the Pump actor as Agitator. As sensor, select the PT1000 sensor you have defined. The PID parameters need to be derived via the PID Auto tune Plugin. Details on how to run the tuning are described here.
The max Pump temperature defines, when the pump will be switched off to prevent pump failure. 88C is recommended and aligned with the original Braumeister controller settings. The boil output defines the power that is used for boiling. For my Braumeister 20 L , 85% is sufficient, but you can adapt this to your needs for a good boil. Max Boil Temp is the temperature, when the max boil output will be used. Max PID temp is the temperature, until the PID settings are used. Above this temperature, the max output is used. The rest interval is the interval when the pump is paused. Default is 600 (= 10 Minutes like in te braumeister controller). The Rest time is the time in seconds for how long the pump is resting. The standard Braumeister setting is 1 Minute.
Global CraftbeerPi4 server settings
Finally, you need to control / adapt some settings on the server settings page.
You need to set the 'Add MashIn Step' setting to yes for automated recipe creation from Kleiner Brauhelfer, MuMM or Brewfather. In this case, the system will add a first step with a target temp of the mash step and holds the system once the target temp is reached and stops the pump and heating. It'll will notify you to add the malt pip/malt and hit next
You should also enable the auto mode to start and stop the logic automatically after each step.
You don'T need to select a kettle for the boil kettle as your Braumeister is a one Kettle system. But it would not hurt, if you would select the Braumeister as Boil kettle.
For the Mash_Tun you need to select your Braumeister Kettle.
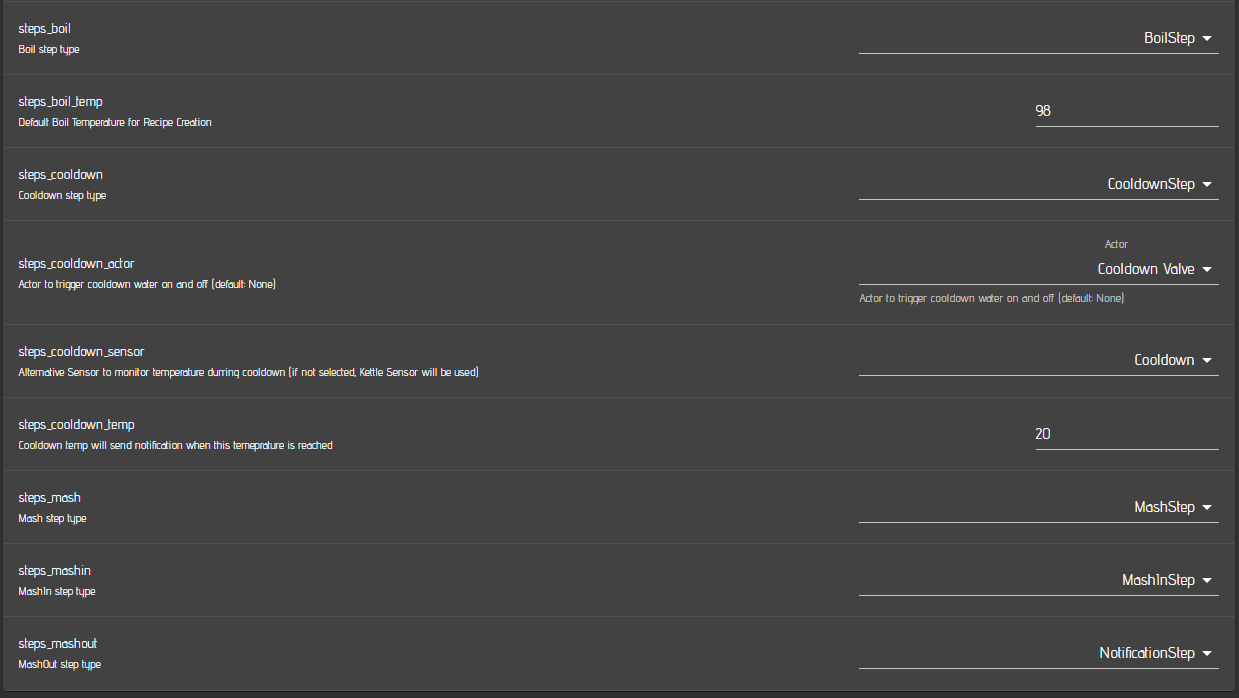
In the steps settings, you need to select the corresponding steps you want to run for your device (You could also create your own steps via a plugin).
Boil should be clear.
The boil temp can be defined and is filled in for the boil step during the automated recipe creation.
If you are using a cool down sensor, select your sensor here. Otherwise the default kettle sensor will be used if no sensor is selected.
If you are using a cool down valve, you need to select the corresponding actor that will be used for this step.
The mash step should be also clear as well as the MashIn step.
Details for all steps are also described in the corresponding section of this documentation
Last updated